
I still remember the first time I made these Crispy Spicy Salmon Bowls at home. The sizzle of perfectly seasoned salmon hitting the hot pan, the mouthwatering aroma filling my kitchen, and the way my dinner guests devoured every last bite—it was an instant favorite!
If you’re looking for a quick, flavorful, and satisfying meal, this recipe belongs in your weekly lineup. The contrast between the warm, crispy salmon and the cool, fresh toppings makes every bite irresistible.
What Makes These Crispy Spicy Salmon Bowls Special?
Unlike typical salmon bowls, this recipe is all about perfect texture and bold flavors. A quick marinade infuses the salmon with smoky spices, while a high-heat sear creates that crispy, golden-brown crust. Paired with fluffy sushi rice, creamy avocado, crunchy vegetables, and a drizzle of spicy mayo, every component shines.
I’ve perfected this recipe through trial and error—just enough spice to wake up your taste buds without overpowering the rich, buttery salmon. Trust me, this will be your new favorite salmon bowl recipe!
Ingredients for the Best Crispy Spicy Salmon Bowls
For the Sushi Rice
- 2 cups sushi rice
- 3 tablespoons rice vinegar
- 1½ tablespoons sugar
- 1 teaspoon salt
For the Crispy Salmon
- 1½ pounds fresh salmon fillets, skin removed
- 1 teaspoon salt
- 1 teaspoon garlic powder
- ½ teaspoon onion powder
- 1 teaspoon chili powder
- 1 teaspoon paprika
- ½ teaspoon dried oregano
- 2-3 tablespoons sesame oil (for cooking)
For the Spicy Mayo
- ⅓ cup Kewpie mayo
- 2 tablespoons sriracha sauce (adjust to taste)
- 1 teaspoon honey
For Assembly
- 1 tablespoon black sesame seeds
- 1 ripe avocado, sliced
- 1 large carrot, julienned
- 2 Persian cucumbers, thinly sliced
- 4 scallions, thinly sliced
- 2 tablespoons salmon caviar (optional but recommended)
- 2 sheets nori, cut into thin strips
How to Make Crispy Spicy Salmon Bowls
Step 1: Prepare the Sushi Rice
Great salmon bowls start with perfectly seasoned rice. Cook the sushi rice according to the package directions.
While it’s cooking, heat the rice vinegar, sugar, and salt in a small saucepan—just until dissolved (don’t boil it). Once the rice is done, transfer it to a large bowl and gently fold in the vinegar mixture using a cutting motion. Let it cool slightly before using.
Step 2: Season & Prep the Salmon
The key to crispy salmon? Removing excess moisture. Pat the fillets dry with paper towels before cutting them into 1½-inch chunks—this helps them sear beautifully.
In a bowl, toss the salmon pieces with salt, garlic powder, onion powder, chili powder, paprika, and oregano until evenly coated.
Step 3: Sear to Crispy Perfection
Heat sesame oil in a large skillet over medium-high heat. Once shimmering, add the salmon pieces in a single layer (don’t overcrowd the pan).
Resist the urge to move them! Let them cook undisturbed for 3-4 minutes until a golden crust forms. Flip and cook for another 2-3 minutes until crispy on both sides and cooked through (internal temp: 145°F).
Step 4: Make the Spicy Mayo
While the salmon is cooking, mix Kewpie mayo, sriracha, and honey in a small bowl until smooth. Adjust the spice level to your preference. For easy drizzling, transfer the sauce to a squeeze bottle.
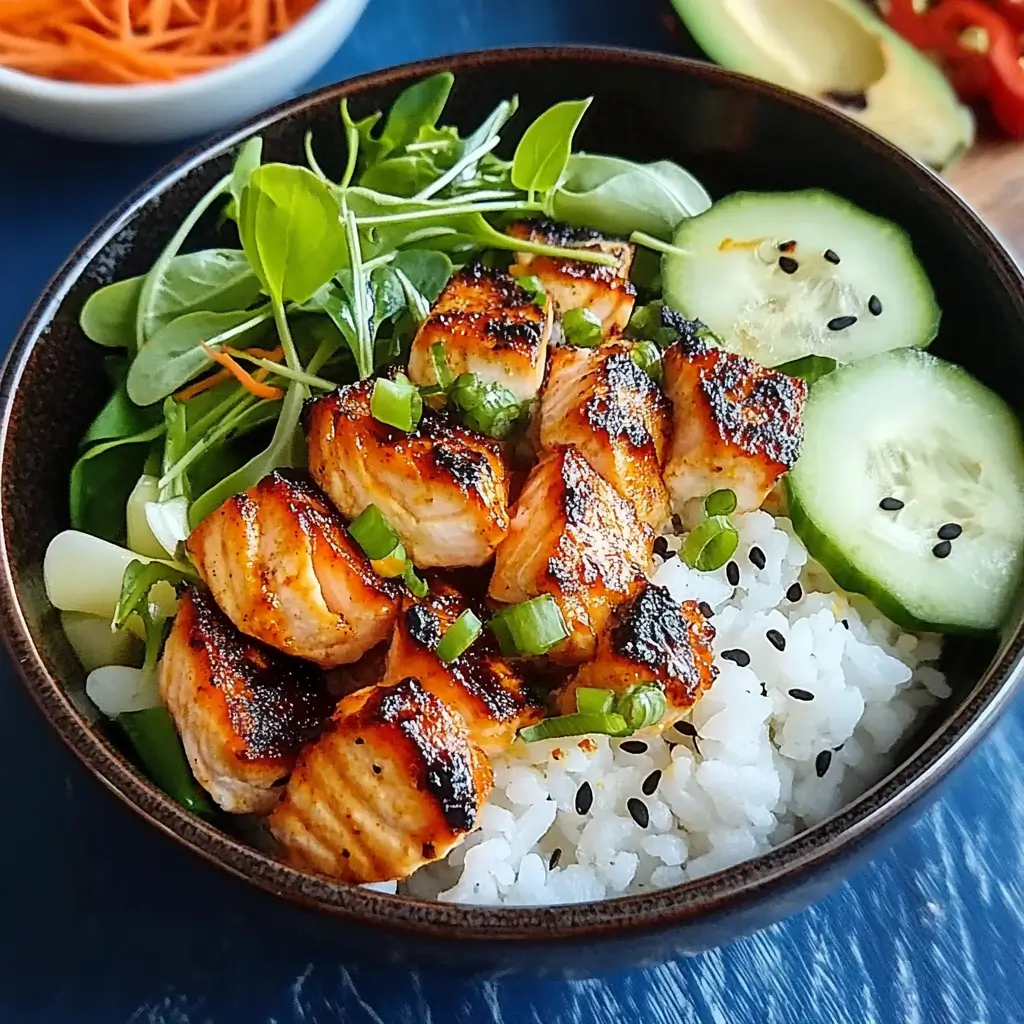
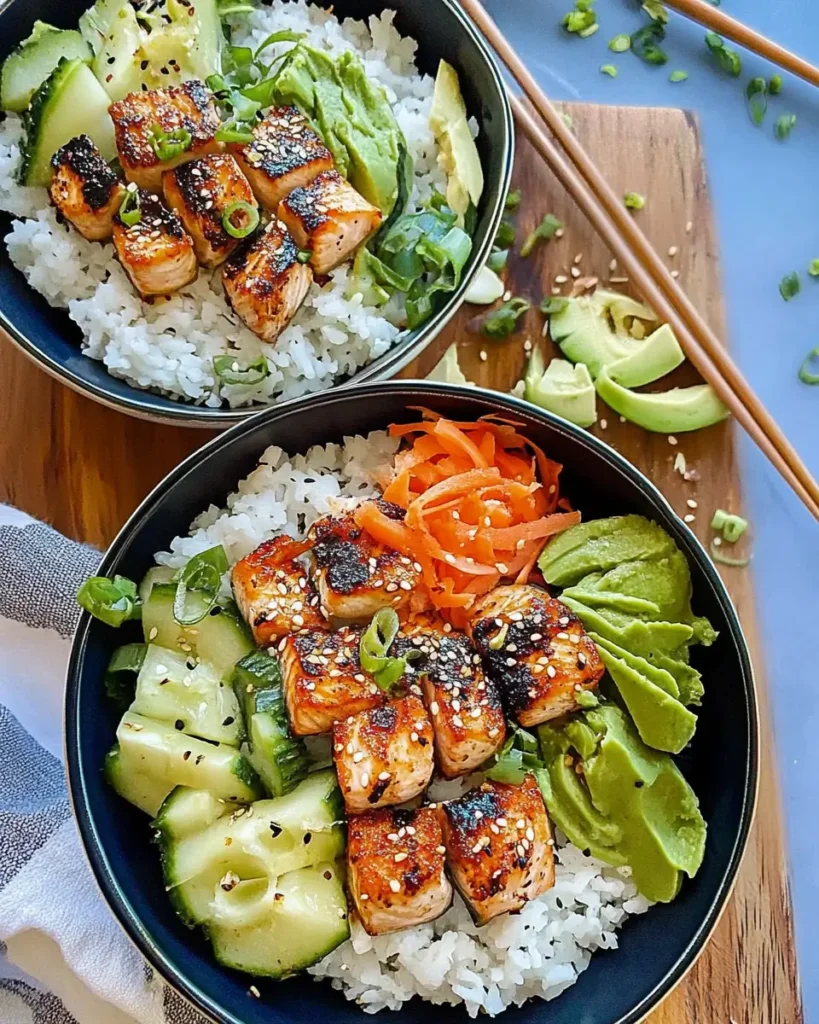
Step 5: Assemble Your Salmon Bowls
Start with a base of seasoned sushi rice, then arrange crispy salmon, avocado, carrots, cucumbers, and scallions around the bowl. Garnish with black sesame seeds, nori strips, and salmon caviar for extra umami. Finally, drizzle with spicy mayo and enjoy!
Pro Tips for the Best Crispy Spicy Salmon Bowls

Pat the salmon dry before seasoning to get the crispiest crust.
Use a cast iron or stainless steel pan for the best sear.
Let the salmon sit at room temp for 10 minutes before cooking for even results.
Don’t stir the salmon too early—let it develop a crust before flipping.
Start with less sriracha in the mayo and add more to taste.
Serving Suggestions
Pair your Crispy Spicy Salmon Bowl with:
A side of miso soup for a complete Japanese-inspired meal
Pickled ginger & wasabi for a sushi-like experience
A cold Sapporo beer or sake for the perfect drink pairing
Storage & Meal Prep Tips
If you have leftovers or want to meal prep:
Store components separately (salmon, rice, veggies, and sauce).
Reheat salmon in a hot skillet for 1-2 minutes—avoid microwaving.
Sprinkle water over rice before reheating to restore its texture.
Chop veggies & make the spicy mayo up to 3 days in advance.
These bowls taste best fresh but will keep for 2-3 days in the fridge.
Customizing Your Crispy Spicy Salmon Bowls
This recipe is super adaptable! Try these variations:
Want extra heat? Add jalapeños or a drizzle of chili oil.
Lower carb? Swap sushi rice for cauliflower rice or mixed greens.
No salmon? This method works with tuna, shrimp, or even tofu.
Craving crunch? Top with tempura flakes or crispy shallots.
Why This Recipe Works
After years of testing, I’ve found that the best dishes balance flavor and texture. This Crispy Spicy Salmon Bowl does exactly that—it’s crispy, creamy, spicy, and fresh all at once.
Whether you’re making a quick weeknight dinner or impressing guests, this easy salmon bowl recipe delivers big flavors with minimal effort.
Give it a try, and let me know—will this become your new favorite salmon recipe?
FAQs About Crispy Spicy Salmon Bowls
Can I use frozen salmon?
Yes! Thaw completely, pat dry, and follow the recipe as directed.
What’s the best mayo substitute for spicy mayo?
You can use Greek yogurt for a lighter option, or regular mayo with a splash of rice vinegar.
Can I make this dish ahead of time?
Yes! Prep the rice, spicy mayo, and veggies in advance for quick assembly later.
Is this dish gluten-free?
Yes, just double-check that your sriracha and mayo are gluten-free!
Conclusion
These Crispy Spicy Salmon Bowls are the ultimate combination of bold flavors, crispy textures, and creamy, spicy goodness. Whether you’re craving a quick, healthy meal or a fun sushi-inspired dish, this recipe delivers big on taste!
Try it today and enjoy a restaurant-quality bowl in just 25 minutes!

Crispy Spicy Salmon Bowls
Equipment
- Large Skillet
Ingredients
Sushi Rice
- 2 cups sushi rice
- 3 tbsp rice vinegar
- 1.5 tbsp sugar
- 1 tsp salt
Crispy Salmon
- 1.5 lbs fresh salmon fillets skin removed
- 1 tsp salt
- 1 tsp garlic powder
- 0.5 tsp onion powder
- 1 tsp chili powder
- 1 tsp paprika
- 0.5 tsp dried oregano
- 2-3 tbsp sesame oil for cooking
Spicy Mayo
- 1/3 cup Kewpie mayo
- 2 tbsp sriracha sauce adjust to taste
- 1 tsp honey
For Assembly
- 1 tbsp black sesame seeds
- 1 ripe avocado sliced
- 1 large carrot julienned
- 2 Persian cucumbers thinly sliced
- 4 scallions thinly sliced
- 2 tbsp salmon caviar optional but recommended
- 2 sheets nori cut into thin strips
Instructions
- Cook the sushi rice according to package instructions. While cooking, heat rice vinegar, sugar, and salt in a saucepan until dissolved. Mix with rice and let cool.
- Pat salmon dry, cut into 1½-inch chunks, and toss with salt, garlic powder, onion powder, chili powder, paprika, and oregano.
- Heat sesame oil in a skillet over medium-high heat. Add salmon in a single layer and cook undisturbed for 3-4 minutes until crispy. Flip and cook for another 2-3 minutes.
- Mix Kewpie mayo, sriracha, and honey in a bowl. Adjust spice level to taste.
- Assemble bowls: Start with sushi rice, then add crispy salmon, avocado, carrots, cucumbers, and scallions. Garnish with black sesame seeds, nori, and salmon caviar. Drizzle with spicy mayo.